
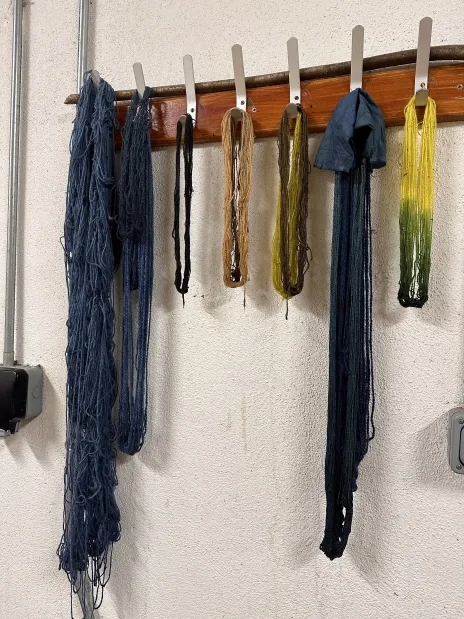
At the recent Principality Coronet Tournament (Ilchomórtas Coróineád Insulae Draconis in my Barony of Eplaheimr, I wanted to do a workshop that included a lot of dyeing info in a (hopefully) accessible way, so I decided to show how to do a standard dyebath (I chose weld) , a dye Vat (Indigo) and how using modifiers and overdyeing affected colours(gall tannins and iron for black, and weld overdyed with indigo for green) . It was easy to do in the context of the Insuale Draconis colours – Blue, Yellow and Black – with that bonus Green from event hosts Eplaheimr. We achieved this by choosing
Yellow from Weld (very old dyestuff)
- Blue from Indigo (mid to late period, Woad is early period alternative, same active agent, also needs a VAT)
- Black from Tannin and Iron
This just happens to give us a really excellent overview of many aspects and techniques in period dyeing and we got to try overdyeing for our bonus Eplaheimr green.
Hands on tips and tricks from this workshop
- Once your bath is good to go and normally clear of dye material you add your Cloth/fibres WET.
- FOR BATHS – The longer you can leave the baths the better chance you have of colour uptake.
- FOR VATS – you want to dip repeatedly til the colour is about two shades deeper wet than you are hoping for dry.
- Adding lots more dyestuff is actually less effective than dyeing and then redyeing your item in a fresh dyebath.
- The dyebath/vat will colour a strong colour the first time and progressively weaker colours if reused after the first. Historically the first bath would have been the most expensive, so a rich, deep scarlet would have been the first colour and cost the most, fading to a pink rinse for subsequent items that would be cheaper to pay for.
- Yellows are easily produced by the standard dyebath process.
- Blue is harder as woad and Indigo, the best sources for period blue, are not water soluble – There are a great many ways to prepare Indigo/Woad Vats, many extremely unpleasant on the nose and involving a long wait. We’re going with an INDIGO HYDROS VAT this is modern, but lets us do it in one afternoon – Vats are a more complex process than a standard dye bath
- Black is a result of the chemical reaction between gallotannic acid, iron and oxygen. It is also the most common way Black ink was made when bound with gum.
YELLOW – Process one: WELD DYEBATH
Ideally soak you weld overnight in some hand hot water, an hour before you wish to dye materials heat the mixture to about 50 degrees. Weld is a lot of little bits of plant material, so strain it before you add fibres. We’re going to add differently mordanted yarn to the weld to see the differences it makes. The Alum only prepared wool should be a vibrant, almost day glow yellow. The wool should have plenty of room to float and soak freely to absorb the dye stuff. Keep gently warm so as not to felt the wool for one hour at least. I’m going to be doing a big batch of weld soon just so I can overdye it.
BLUE – Process two: Indigo VAT (this is just a reminder of the process covered in class)
First mix the indigo powder (we used 10 grams) into a paste with warm water – the colour should be heading towards a dark, almost metallic looking purple. Add this to about 700ml of warm water in a suitable smaller container. Glass will make it easy to spot if things are going to plan. Add ⅔ of your soda ash and stir until dissolved this will make the mixture more alkaline. When it settles a bit – with a FACEMASK ON – sprinkle ⅔ of the hydros powder over the surface and mix *GENTLY*. Hydros removes oxygen, don’t stir it too much and add it back in again. You should see a metallic or petrol looking sheen on the top, this is called the flower. The mixture beneath will start to look green (not dramatically in my experience) Leave for 20 minutes.
Take a larger container with 9 liters of hot water, use your smaller container to introduce your indigo mixture to your larger container add the last of the soda ash and again WITH MASK ON sprinkle on the last of the hydos. Wait another 20 minutes and again you should see the flower. When done, dip your fibres til they are two shades darker wet than you want them to be when they are dry.
BLACK – Process three: Adding modifiers
Dye your fibres in a dyebath of oakgall tannins – tannin usually makes fibres some shade of beige or light brown. In our case I had been soaking oakgalls for well over 6 months and we heated it for about half an hour so the fibre took a pleasingly dark shade.
I separated out the sample fibre into a smaller glass jar on the dye solution and added a small amount of ferrous sulphate. The dye bath went insta-black with a couple of gentle swirls.
To add some more depth we dipped it in the indigo as well, because why not.
(The bonus round, Eplaheimr Green) Process four: Overdyeing
Weld dyed fibres, even when freshly dyed, go a stunning colour green when dipped in indigo vat. Since Green is my favourite colour I will be doing a workshop on this again, and also with cochineal to make purple.
Leave a Reply